Sunday, February 27, 2022

Sitecore Layout Demo


Step 1:

·         Create template and datasource folder

·         Create template folder which keeps the new template items.

Step 2:

·         Write a code for ContentResolver

public class EventsListResolver : Sitecore.LayoutService.ItemRendering.ContentsResolvers.RenderingContentsResolver

    {

        private List<Item> items = new List<Item>();


        public override object ResolveContents(Sitecore.Mvc.Presentation.Rendering rendering, IRenderingConfiguration renderingConfig)

        {

            Assert.ArgumentNotNull(rendering, nameof(rendering));

            Assert.ArgumentNotNull(renderingConfig, nameof(renderingConfig));


            Item ds = GetContextItem(rendering, renderingConfig);


            var recommendedItemsFieldId = Templates.EventRenderingModel.TemplateId;


            //if the rendering datasource has curated items

            if (ds != null)

            {

                foreach (Sitecore.Data.Items.Item childItem in ds.Children)

                {

                    items.Add(childItem);

                }

            }


            if (!items.Any())

                return null;


            JObject jobject = new JObject()

            {

                ["items"] = (JToken)new JArray()

            };


            List<Item> objList = items != null ? items.ToList() : null;

            if (objList == null || objList.Count == 0)

                return jobject;

            jobject["items"] = ProcessItems(objList, rendering, renderingConfig);

            return jobject;

        }


        private string GetItemUrl(Item item)

        {

            return Sitecore.Links.LinkManager.GetItemUrl(item);

        }

    }


Step 3:

·         Create Content Resolver in Sitecore


Step 4:

·         create new rendering in Sitecore JSS


Step 5:

·         Add rendering to the page


Step 6:

·         Check the layout service result

https://sc102sc.dev.local/sitecore/api/layout/render/jss?item={49D28007-AFAF-49A7-B6AE-08E05FBAEB76}&sc_apikey={81E7F129-B5DA-4EC7-8C85-C5B2FE3FA3A1}

Before

After

Step 7:

·           Check the page in your site.


Step 8:

·         Create new component in JSS app


·         This is Sitecore definition item


·         Now I added the fields which are available in templates,

·         This is components definition item.


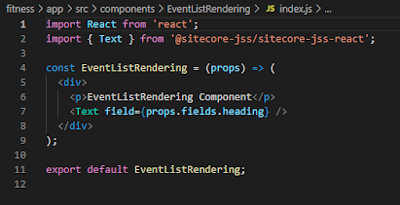
·         We have to loop all the event list here by help of react team.

Sitecore First Workflow


Creating Renderings

·         When creating rendering items, use the Json Rendering template instead of View renderings, controller rendering, etc. This rendering template is automatically rendered to JSON when emitted via Layout Service.

·         Also unique to Json Rendering, the Component Name field is a string that needs to match up to the name of a component registered in the JSS app.

·         For example, if you created a rendering with Sitecoreshades as the component name, the JSS app would need a Sitecoreshades.js component that was registered with its component mapping as " Sitecoreshades " -> Sitecoreshades.js.

·         If a component name cannot be mapped, JSS apps will show a placeholder with the name of the missing component received from Sitecore. This can be used to scaffold out a component hierarchy prior to frontend developers actually implementing the view of the components.

Special Notes

·         If you add a placeholder to a rendering, don't forget to add it to the Layout Service Placeholders field on the rendering item .

·         if this is not done, Layout Service will not attempt to render the child placeholder, and you will not receive any renderings added to it in the Layout Service data.

Editing & Creating Routes

Creating routes Sitecore-first is just like adding pages in a traditional Sitecore site.

Scripted component scaffolding in Sitecore-first

When working in a Sitecore-first application, the task of adding a new component involves a repetitive set of steps (creating a rendering item, datasource template item, datasource location folders, linking them together, etc). To keep this simple, there are JSS CLI commands to help scaffold JSS components' Sitecore infrastructure:

·         jss deploy component deploys a new component (similar to manifest.addComponent() for code-first, but directly to the Sitecore database)

·         jss deploy template deploys a new Sitecore template (for use as a content template, settings item, etc)

Run jss deploy component --help for documentation; a usage can be as simple as jss deploy component HelloWorld --allowedPlaceholders content.

Transitioning from Code-first to Sitecore-first

The JSS sample apps are all set up to use code-first workflow by default. At some point, apps may wish to transition from working with disconnected data and importing that into Sitecore to treating Sitecore data as the master.

Such a transition would usually be because:

·         An app started its life as a code-first disconnected prototype and is transitioning to be Sitecore integrated

·         App developers are more comfortable working in Sitecore than in JS and prefer a familiar backend

Removing Code-First Artifacts

These instructions apply to all supported JS libraries.

Extensively customized apps using different techniques than the standard sample apps may require additional steps depending on their customizations.

·         Delete /data to remove disconnected route data, if it exists

·         Delete /sitecore/definitions to remove the manifest definitions

·         Delete /sitecore/pipelines (if it exists) to remove manifest pipeline patches

·         Delete /scripts/disconnected-mode-proxy.js to remove an unused script

·         In the package.json:

ü  Remove the start script, and (optional) rename start:connected to start to remove the option to start disconnected

ü  Remove the bootstrap:disconnected script

Working After Removal

Once code-first has been removed from the app, you may continue development as before but without expecting any new items to come from the JSS app.

Let's have a look Sitecore Layout Demo

JSS Layout Service


The presentation layer retrieves data from the CMS using an API endpoint

·        The Sitecore Layout Service is a Sitecore Headless Services endpoint that provides JSON formatted Sitecore content. You use the Sitecore Layout Service Client to communicate with the Layout Service, and you use the Sitecore Rendering Engine to render the content.

·         This is the presentation layer that provides the composition of pages and the data needed for each component.

·         A REST endpoint that exposes dynamically generated Sitecore content as structured JSON data for consumption by rendering hosts and other consumers.

When should I use this?

To provide an endpoint for the consumption of Sitecore content which will be consumed by

·         JSS apps

·         Asp.net Rendering SDK

·         Jamstack sites

We can consume JSON over HTTP request.

a company can have their corporate site built in .NET, a brand site built in Next.js, and a mobile app built in React Native, and all three could use the same API for data. This makes managing content across web assets easier for Content Authors.

What is difference from traditional Sitecore architecture?

·         No razor rendering

·         Shorter pipeline compared to MVC rendering

·         We can choose different front end technology

·         Separation of rendering from traditional layout

Who should use JSS

Any company that has chosen Sitecore as their enterprise web platform and wants to utilize the benefits of front-end JavaScript frameworks in their web app is perfectly suited for using JSS.

Mock Layout Service

The mock Layout Service emulates the data you would receive from the actual Sitecore Layout Service, while also preparing your JSS app for code-first deployment.

Why It's Important:

  • The mock Layout Service provides a consistent API to create a complex single-page JSS application that includes components, routes, and custom route types as well as the needed data for each component.
  • The mock Layout Service also provides integration with Sitecore.

Three Notable Factors for the Layout Service Process:

  • Your disconnected JSS app is essentially built to consume and render a data-driven layout made available via the mock Layout Service.
  • Normally, the component data is a set of fields from the datasource item.
  • When the mock or Sitecore Layout Service renders a page, it returns a JSON representation of the layout of the route and the data for each component.

NOTE when connecting a JSS app to Sitecore:

  • Currently, there are no tools built into the JSS SDK to retrieve and store Sitecore-connected Layout Service data as files.
  • Should you later import your JSS app to Sitecore and no longer need the mock Layout Service that the sample apps use, you can instead save Layout Service data queried from Sitecore in a JSON file.
  • Once you have that data locally (i.e., you're disconnected), you might consider building your own service layer to fetch "raw" Layout Service data from the JSON file(s) you saved.

Friday, February 18, 2022

searchstax - Sitecore


Managed Solr Search

The SearchStax Solr-as-a-Service solution gives developers their time back and automates a huge chunk of this operational work without making them code any flexibility or give up any control over their Solr infrastructure.

Managed Solr


Why Managed Solr?

  • Built-in Alerting and Monitoring Dashboard
  • Backups
  • Disaster Recovery
  • Scaling Up, Down, and Auto-Scaling
  • Private Environments
  • Security and Compliance

How to integrate with Sitecore?


Step 1:


  • Start the free trial

https://www.searchstax.com/freetrial/


Step 2:

  • Create new Deployment


Special Note :

  • Check the compatible Solr version for your Sitecore instance.

https://support.sitecore.com/kb?id=kb_article_view&sysparm_article=KB0227897

  • Create your deployment & you will land this page.


  • It’ll take few minutes for finish the deployment. You can go to break until it’s done.
  • You would receive the email , once it deployed.

Received Email :


Step 3:

  • Open the Solr Service URL


  • Once you create your deployment, you will see it in the Solr Deployments dashboard.
  • You can access the Solr now,


Step 4:

Secure Zookeeper with an IP Filter

This term is very new to me, are you feeling same???


Let’s know about Zookeeper

What is ZooKeeper?

  • Zookeepers are a central repository for SolrCloud configuration. You can consider it as a distributed filesystem which can be accessed by all Solr nodes in the cluster. So if you change any config file you just need to inform or upload it to Zookeeper and not on every node in the cluster.
  • One more important responsibility of Zookeeper is to keep an eye on the state of all Solr nodes in the cluster. If any node goes down and a search request comes in for that node, Zookeeper routes it to an alternative replica node.
  • When you are updating any document in SolrCloud, it is zookeeper who delegates your update request to the appropriate node in the cloud holding the document

How can I secure Zookeeper?

When SearchStax creates a new Solr deployment, we lock down the Zookeeper ensemble so that it cannot be reached from the Internet. To upload a configuration to Zookeeper, you have to add an IP Filter that whitelists your work computer or subnet.

Let’s do it


  • Click on the name
  • Go to the detail page
  • Remove the existing row

  • Add new row


  • Then save changes.

we need to wait for 5 minutes to reflect the changes.


Step 5:


Install PowerShell Core and Yaml Module

  • Check powershell version - $PSVersionTable

  • Install Powersheel 7 - iex "& { $(irm https://aka.ms/install-powershell.ps1) } -UseMSI"
  • start Powershell Core as the Administrator.- Install-Module powershell-yaml

  • Verify powershell core

Step 6:

Run the SearchStax Sitecore Plugin

  • The SearchStax Sitecore Plugin must be run on the same Windows computer as your Sitecore instance

Download the Plugin

https://github.com/searchstax/searchstax-sitecore-plugin/releases

  • Extract the file

Connect Solr with sitecore instance

  • Edit the config.yml file in the searchstax-sitecore-plugin-x.y directory.

Windows Powershell Core:

  • Set-ExecutionPolicy -Scope Process -ExecutionPolicy Bypass
  • Run the sitecore-searchstax-connector.ps1 script.
  • Windows Powershell Core:
  • .\sitecore-searchstax-connector.ps1

  • We can find some configuration once it done , please follow that..

Before connecting

After connecting


Step 6:

Populate Schema from the Control Panel in Sitecore

  • Log in to the Sitecore Content Management environment.

  • Open the Sitecore Control Panel.

  • In the Indexing tab, click Populate Solr Managed Schema

  • Select all indexes and click Populate
  • On the same page, go to the Indexing Manager, select all, and click Rebuild.

Steps to follow when using a PowerShell script to modify the goals in Sitecore

I have previously utilized PowerShell for item creation, modification, deletion, and presentation details in Sitecore.   Ø Recently, I attem...